At this time, I'll share about "How to Change Blogger Theme with Your Own Picture".
Actually, It is simple, but many people don't know how to change it. So, I'll try to share it now.
Okay, follow this step.
NB : You must have some image hosting ID such as
Photobucket, and so on. You can use
DeviantArt too.
- Create your theme
Create your theme first. You can use Image Editor Software like Photoshop.
Sorry, I don't show any example yet. I'll make How to create a theme in other post.
- Open Your Image Hosting Site
Open your Image Hosting site now. I use Photobucket for this one. So, I'll tell you how I use Photobucket.If you don't have any, you must Sign Up first. And this is the step to join Photobucket.
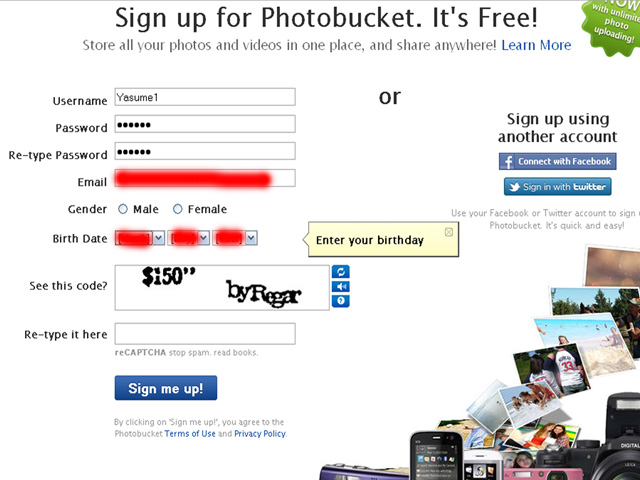
1. Sign Up First (If you didn't have any)
 |
| Sign Up First |
|
|
2. Fill the registration box
 |
| Fill the Registration Box |
3. Sign In and Upload Your Photos
 |
| Click Upload Button |
 |
Appearance After You Click Upload Button.
Now you can upload a photo.
Press CTRL + Click if you want to upload any photos. |
|
4.Open your Image and Copy the Link.
 |
| Go to your uploaded image and copy the link. |
Now, you have finish all of the requirement for changing your blogger theme. Now, back to your blog.
- Open your Blogger and Go to Edit HTML
- After that, search this code (use CTRL+F to find it easily)
body {
background:$bgcolor;
margin:0;
color:$textcolor;
font:x-small Georgia Serif;
font-size/* */:/**/small;
font-size: /**/small;
text-align: center;
}
Change the code to look like this:
body {
background:$bgcolor;
background-image: url('the address for this image'); background-position: center;
background-repeat: no-repeat;
background-attachment: fixed;
margin:0;
color:$textcolor;
font:x-small Georgia Serif;
font-size/* */:/**/small;
font-size: /**/small;
text-align: center;
}
- Paste your image link (from Photobucket) to background-image: url('the address for this image');
- See your Blog now :D
I think that's all, thank you for visiting my blog and keep follow me ^^
Reference :
http://websitetemplatedatabase.com/photoshoptutorials/24-bloggertemplatepart2
OK, kali ini saya akan mencoba share tentang "Bagaimana mengubah tema blogger dengan gambar sendiri"
Mungkin sudah banyak yang tahu akan hal ini, tapi mungkin juga ada banyak yang belum mengerti. Jadi, silahkan lihat stepnya.
.
NB : Anda harus memiliki Image hosting seperto
Photobucket, dan lainnya. Bisa juga
DeviantArt.
- Buat Tema yang Anda Inginkan
Buatlah tema anda terlibih dahulu. Anda bisa gunakan berbagai image editor seperti Photoshop. Dan maaf, saya belum bisa memeberikan contohnya. Namun, akan saya share di post lain.
- Open Your Image Hosting Site
Buka Image Hosting Site anda. Saya menggunakan Photobucket . Jika anda belum memiliki Image Hosting Site, anda bisa mengikuti cara ini.
1. Daftar
|
| Sign Up |
|
|
2. Isi Form Registrasi
|
| Isi Registration Box |
3. Sign In dan Upload Foto Anda
|
| Klik Upload Button |
|
Inilah tampilan yang muncul setelah anda mengklik Upload
Sekarang anda bisa mengupload gambar anda.
Tekan CTRL untuk menambah jumlah file yang ingin diupload. |
|
4.Open your Image and Copy the Link.
|
| Sekarang lihat gambar yang anda upload, dan copy linknya. |
Sekarang, anda sudah selesai dengan persiapan awal. Sekarang, kembali ke
Blogger.
- Buka Blogger dan pilih Edit HTML
- Setelah itu, temukan kode ini (CTRL+F untuk mempermudah anda)
body {
background:$bgcolor;
margin:0;
color:$textcolor;
font:x-small Georgia Serif;
font-size/* */:/**/small;
font-size: /**/small;
text-align: center;
}
Ubah kode tersebut menjadi seperti ini:
body {
background:$bgcolor;
background-image: url('the address for this image'); background-position: center;
background-repeat: no-repeat;
background-attachment: fixed;
margin:0;
color:$textcolor;
font:x-small Georgia Serif;
font-size/* */:/**/small;
font-size: /**/small;
text-align: center;
}
- Paste link tadi ke background-image: url('the address for this image');
- Lihat blog anda sekarang. :D
OK, semoga ini dapat membantu anda sekalian, jika ada salah kata, mohon maaf. Terima kasih dan tetap ikuti saya terus ya ^^
Reference :
http://websitetemplatedatabase.com/photoshoptutorials/24-bloggertemplatepart2


0 comments:
Post a Comment